Editing your team’s music at home sounds like a daunting idea to many teams, but it is a skill that can save you time, money, and make your professional mixes sound the way you expect with the least effort and wasted time. Today, we’re talking about the best free at home software – Audacity. This is a program I have sworn by since I first used it (due to a desperate lack of options) back in 2005. I had no money to spend on music for fall football, but there were a pile of projects waiting to get done. Now that I know what I’m doing there is no end to the uses for Audacity. I fix speed problems, make fall songs, get dances ready for kids clinics, edit practice music, make something quick when the JV music doesn’t work right, you name it.
Understanding a bit at home also makes you more productive in the professional studio. You know what a realistic cut is and how things might possibly sound before you get there and just hope for the best. Just hearing a song with a proper speed change can give you an idea of what will work in a mix. Its also great to make a few different speeds for practice so you're not playing guess and check with your music equipment.
Lets dig into a quick tutorial of just the very basics of this awesome program: If you’re not a technical person you might want to take a deep breath, relax, and read things carefully. This isn’t overwhelming but its new – I really think anyone can learn this by trial and error and by not getting frustrated.
First off, you need to get the program. It’s free from the creator and is a safe download. They have a “beta” version out right now – I’d skip that and stick with their current version: Audacity 1.2.6 (if you have a Mac or Linux there are those versions too) You’ll also want the MP3 encoder plug-in (link is just below the main download) so you can make your finished product an MP3 rather than a poor quality .WAV file (this used to be the only way to do it when I first learned, not a good quality for playing in gyms) More info here. Install and setup as directed.
Next, import the audio file(s) you want to work on. These can be MP3s or something from a CD, anything downloaded on your computer. This step is done by going to PROJECT>IMPORT AUDIO. If you go to FILE>OPEN it will want you to open an Audacity project file, which you don’t have one yet. A “stereo” track will now appear in the work area.


Understand what you are looking at: There are 2 identical lines of audio sound waves that are being shown to you visually. This is one for each channel (speaker) in a stereo setting. For dance team, you want your projects to be in stereo sound. Audacity lets you edit both stereo tracks at the same time; don’t worry about trying to do just one or the other, they are locked together.

Playing audio and finding an edit: Try playing your song you’ve imported. There are play, stop, and pause buttons just like a boombox on the main tool bar above your song. You’ll see a line going from left to right across your file as it plays. This is your marker of where you are at in the song. Also at the top left corner are 6 tools. Initially you’ll only need the highlighting tool (looks like an “I”) and the magnifying glass just below it.

Pause the line about where you think you would like an edit in your song then switch your tool to the magnifying glass to zoom in to that section. The visual sound waves you see will help you adjust your paused line to just the right instant for the cut. Try playing that small clip over and over to hear if the cut should be moved forward or back. To move your curser “line”, just click at the point you’d like it to go. Highlight (click on your line, hold it, and drag to the ending location to highlight when you are using the highlight tool) that area you’d like to remove, then look to your cut/copy/paste buttons on your toolbar. The scissors is cut, the two pages side by side are copy, and the clipboard is paste. This way you can duplicate, remove, or move sections to whole new areas just like you would work with a Microsoft word file.
I have a pen and paper handy at this point to write down edit locations if I need to leave them and come back. Look at the lower right hand corner to see the exact second of the track you are on. Try to get to 4 decimal places out to be really accurate in your highlighting. (i.e. 1:30.3345 is one minute, thirty seconds point three three four five)
Using more than one song: If you’d like to move something away for a while or bring in something from another song, just open another window of Audacity and flip between them. This is the easiest way to keep projects named and saved correctly. Or you can work from one window and make a new stereo track below your current project and move things to there. Be sure to delete this track when you are done or it will play both simultaneously and sound like a mess. (or sound awesome if you edit it that way!) When you export the song at the end, the multiple tracks will compress to become one.
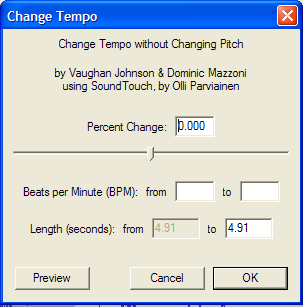
Making adjustments: The biggest tool I use after making edits is to adjust my speeds. There are several ways to do this in Audacity. I like to change the TEMPO not the PITCH. (chipmunk effect is not wanted here!) Remember, to make any change or apply effects – the area must be highlighted. Go to EFFECT>CHANGE TEMPO and adjust using the menu. You can always undo something using EDIT>UNDO if you don’t like it. I always change my speeds to match when editing multiple songs together FIRST, so I don’t have to try to find each edit again and possibly get it wrong. There are multiple crossfade and sound effects to play with in this menu as well. I would also NORMALIZE the final product if there is any techno involved so you don’t hear a distorted mess that has “clipping”. EFFECT>NORMALIZE

Saving and exporting your finished product: Make sure you SAVE and UNIQUELY NAME your project you’re working on, re-saving constantly. The saved file is a unique file type for Audacity, it is not yet an audio file, but this is the file you will use to come back and edit again at a later time. When you are done, export the audio as an MP3 from the FILE menu. (this is the only way to get an audio track for your CDs and MP3 players. Audacity files don’t make sound, they are data files only)
Overall Audacity is really intuitive when it gets down to it. Not sure?- Try something. You can always go back. If something isn’t happening as it should, make sure you have highlighted something to change or check that you’re not on “pause” – some things can’t happen until you fully stop playing the audio. I’ve included links to the Audacity Wiki here for more in-depth discussion. Have fun, dream big, make it the best!
No comments:
Post a Comment